Every attacker lives for the exploitation phase. The attacker has done his research, performed reconnaissance on the target, and found a vulnerability that he is prepared to exploit in order to gain access to the target system. In the remainder of this chapter, we’ll look at packet captures of various exploitation techniques, including an exploit for a semi-recent Microsoft vulnerability, traffic redirection via ARP cache poisoning, and a remoteaccess Trojan performing data exfiltration.
Operation Aurora
In January 2010, Operation Aurora exploited an as yet unknown vulnerability in Internet Explorer. This vulnerability allowed attackers to gain remote root-level control of targeted machines at Google, among other companies.
In order to execute this malicious code, a user simply needed to visit a website using a vulnerable version of Internet Explorer. The attackers then had immediate access to the user’s machine with administrative privileges. Spear phishing, in which the attackers send an email message to victims designed to get them to click a link leading to a malicious site, was used to lure the victims. Since spear phishing messages appear to come from trusted sources, they are often successful.
In the case of Aurora, we pick up this story as soon as the targeted user clicks the link in the spear phishing email message. The resulting packets are contained in the file aurora.pcap.
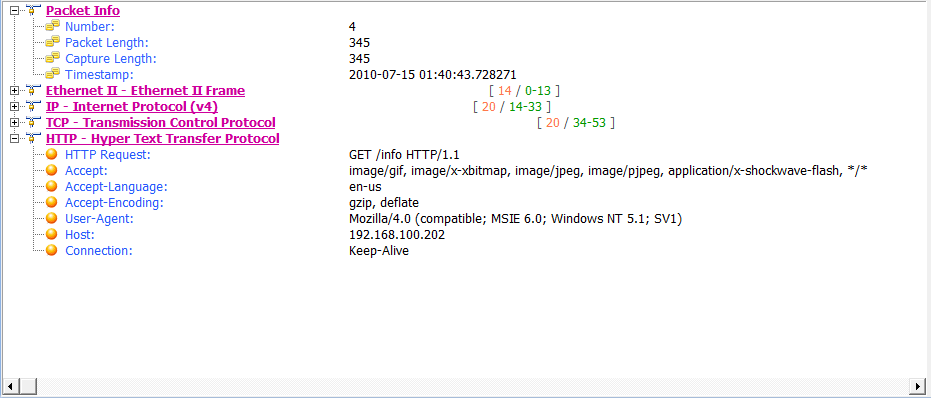
This capture begins with a three-way handshake between the victim (192.168.100.206) and the attacker (192.168.100.202). The initial connection is to port 80, which would lead us to believe this is HTTP traffic. That assumption is confirmed in the fourth packet, an HTTP GET request for /info , as shown in Figure 10-8.
Figure 10-8: The victim makes a GET request for /info.
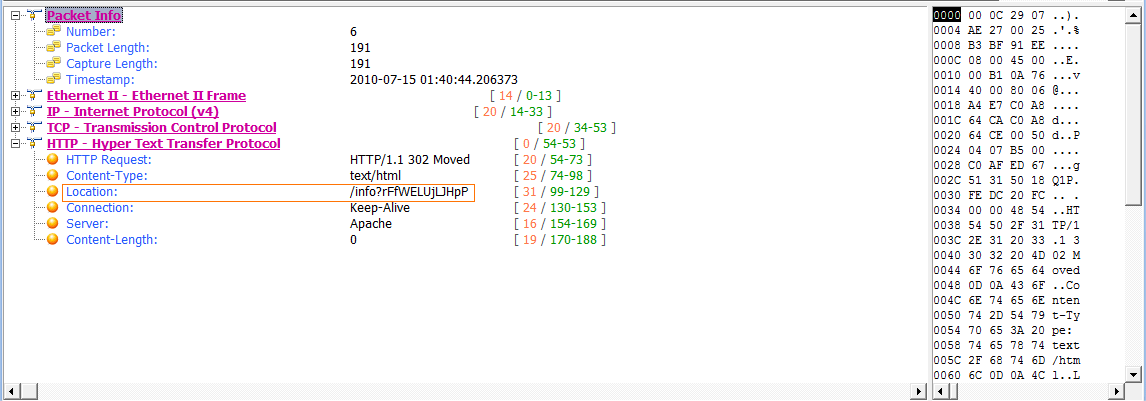
The attacker’s machine acknowledges receipt of the GET request and reports a response code of 302 (Moved Temporarily) in packet 6, the status code commonly used to redirect a browser to another page, which is the case here. Along with the 302 response code ., a Location field specifies the location /info?rFfWELUjLJHpP., as shown in Figure 10-9.
Figure 10-9: The client browser is redirected with this packet.
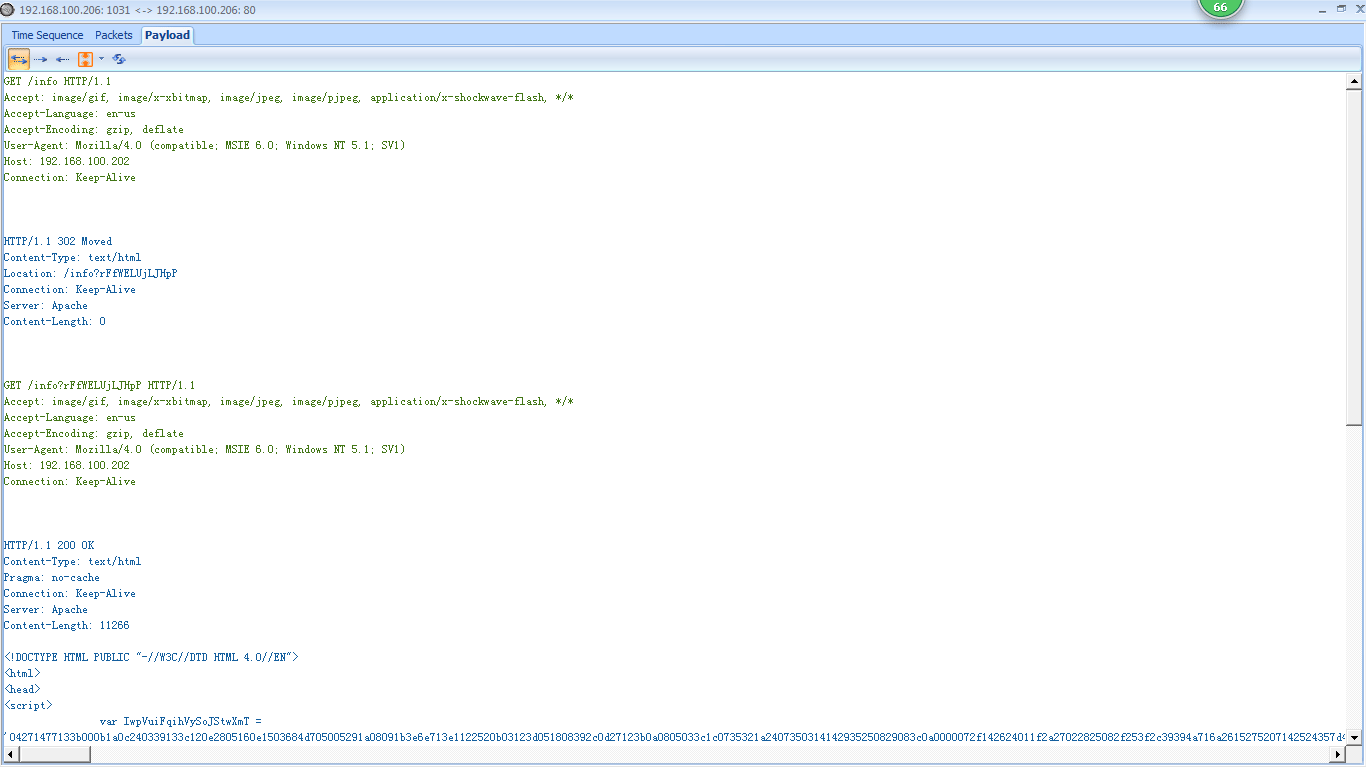
After receiving the HTTP 302 packet, the client initiates another GET request to the /info?rFfWELUjLJHpP URL in packet 7, for which an ACK is received in packet 8. Following the ACK, the next several packets represent data being transferred from the attacker to the victim. To take a closer look at that data, switch to conversation tab and double click the conversation, In this conversation detail window, we see the initial GET request, the 302 redirection, and the second GET request, as shown in Figure 10-10.
Figure 10-10: The data stream being transmitted to the client
After this, things start getting really strange. The attacker responds to the GET request with some very odd-looking content, the first section of which is shown in Figure 10-11.
Figure 10-11: This scrambled content within a <script> tag appears to be encoded.
This content appears to be a series of random numbers and letters inside a <script> tag . The <script> tag is used within HTML to denote the use of a higher-level scripting language. Within this tag, you normally see various scripting statements. But this gibberish indicates that the content may be encoded to hide it from detection. Since we know this is exploit traffic, we might assume that this obfuscated section of text contains the hexadecimal padding and shellcode used to actually exploit the vulnerable service.
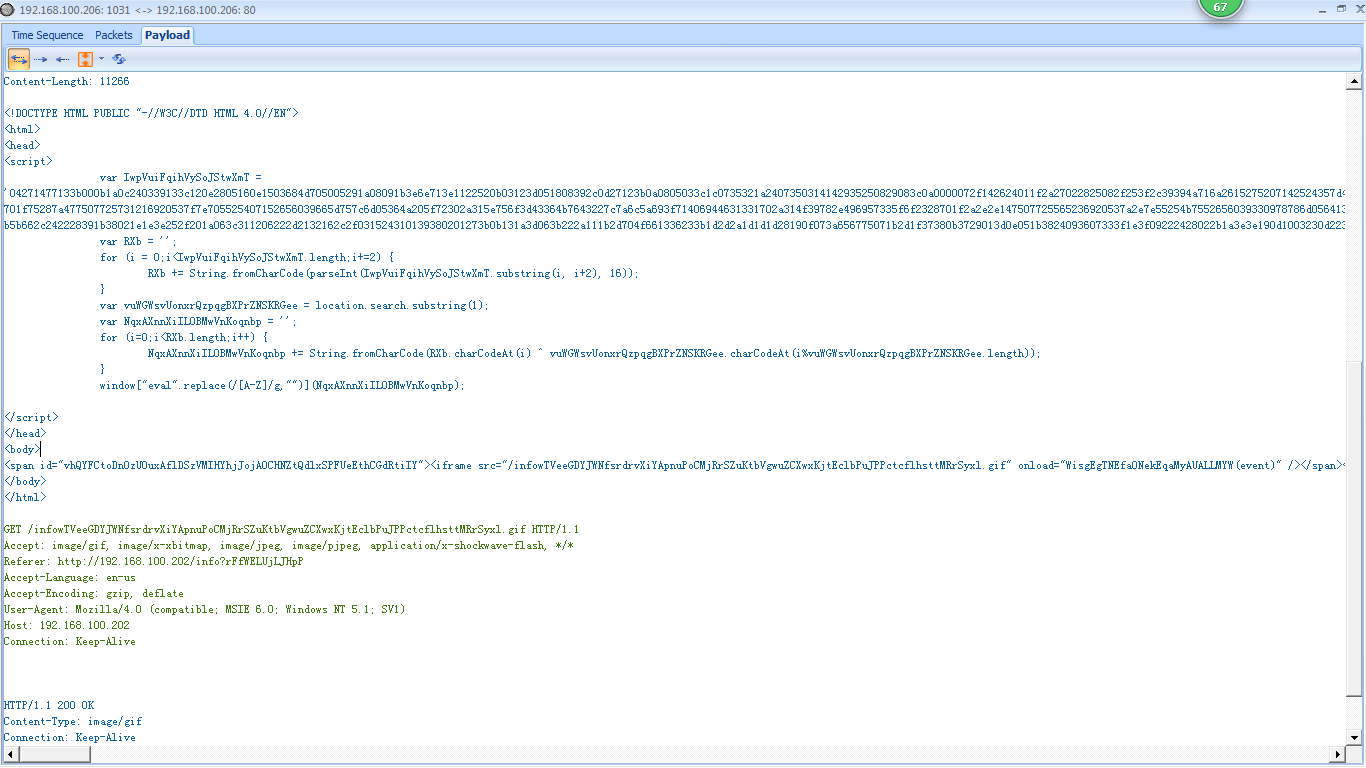
The second portion of the content sent from the attacker is shown in Figure 10-11. After the encoded text, we finally see some text that is readable. Even without extensive programming knowledge, we can see that this text appears to do some string parsing based on a few variables. This is the last bit of text before the closing </script> tag.
The last section of data sent from attacker to client has two parts. The first is a <span id=”vhQYFCtoDnOzUOuxAflDSzVMIHYhjJojAOCHNZtQdlxSPFUeEthCGdRtiIY”> section . The second is contained within the <span></span> tags and is <iframe src=”/infowTVeeGDYJWNfsrdrvXiYApnuPoCMjRrSZuKtbVgwuZCXwxKjtEclbPuJPPctcflhsttMRrSyxl.
gif” onload=”WisgEgTNEfaONekEqaMyAUALLMYW(event)” /> . Once again, this content may be a sign of malicious activity, due to the suspicious long, random strings of unreadable and potentially obfuscated text.
The portion of the code contained within the <span> tag is an iframe, which is a common method used by attackers to embed additional unexpected content into an HTML page. The <iframe> tag creates an inline frame that can go undetected by the user. In this case, the <iframe> tag references an oddly named GIF file. As shown in Figure 10-13, when the victim’s browser sees the reference to this file, it makes a GET request for it in packet 21 , and the GIF is sent immediately following that . This GIF is probably used to somehow trigger the exploit code that has already been downloaded to the victim’s machine.
Figure 10-13: The GIF specified in the iframe is requested and downloaded by the victim.
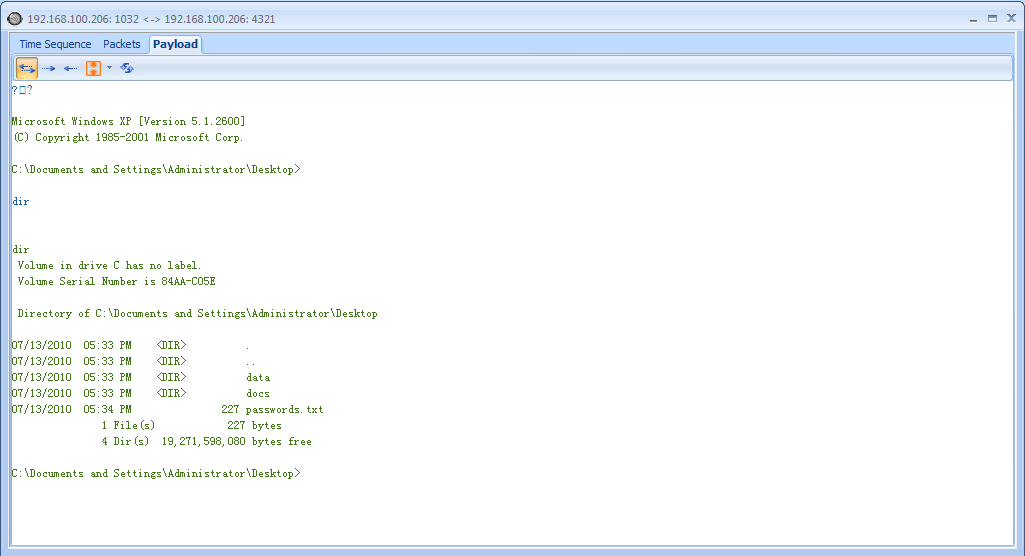
The most peculiar part of this capture occurs at packet 25, when the victim initiates a connection back to the attacker on port 4321. Viewing this second stream of communication from the Packet Details pane doesn’t yield much information, so we will once again view the TCP stream of the communication to get a clearer picture of the data being communicated. Figure 10-14 shows the Follow TCP Stream window output.
Figure 10-14: The attacker is interacting with a command shell through this connection.
In this display, we see something that should set off immediate alarms: a Windows command shell . This shell is sent from the victim to the server, indicating that the attacker’s exploit attempt succeeded and the payload was dropped: The client transmitted a command shell back to the attacker once the exploit was launched. In this capture, we can even see the attacker interacting with the victim by entering the dir command to view a directory listing on the victim’s machine .
An attacker with access to this command shell has unrestricted administrative access to the victim’s machine and can do virtually anything he wishes to it. With just a single click, in a matter of a few seconds, the victim has just given complete control of his computer to an attacker.
Exploits like this are typically encoded to be unrecognizable when going across the wire in order to prevent them from being picked up by the network IDS e.g. sax2 . As such, without prior knowledge of this exploit or even a sample of the exploit code, it might be difficult to tell exactly what it is happening on the victim’s system without further analysis. Luckily, we were able to pick out some telltale signs of malicious code in this packet capture. This includes the obfuscated text in the <script> tags, the peculiar iframe, and the command shell seen in plaintext.
Here is a summary of how the Aurora exploit works:
1. The victim receives a targeted email from the attacker that appears to be legitimate, clicks a link within it, and sends a GET request to the attacker’s malicious site.
2. The attacker’s web server issues a 302 redirection to the victim, and the victim’s browser automatically issues a GET request to the redirected URL.
3. The attacker’s web server transmits a web page containing obfuscated JavaScript code to the client that includes a vulnerability exploit and an iframe containing a link to a malicious GIF image.
4. The victim issues a GET request for the malicious image and downloads it from the server.
5. The JavaScript code transmitted earlier is deobfuscated using the malicious GIF, and the code executes on the victim’s machine, exploiting a vulnerability in Internet Explorer.
6. Once the vulnerability is exploited, the payload hidden within the obfuscated code is executed, opening a new session from the victim to the attacker on port 4321.
7. A command shell is spawned from the payload and shoveled back to the attacker, so that he may interact with it.
From a defender’s point of view, we can use this capture file to create a signature for our IDS that might help capture further occurrences of this attack. For example, we might filter on a nonobfuscated part of the capture, such as the plaintext code at the end of the obfuscated text in the <script> tag. Another train of thought might be to write a signature for all HTTP traffic with a 302 redirection to a site with info in the URL. This signature would need some additional tuning in order to be viable in a production environment, but it’s a good start.
TIPS The ability to create traffic signatures based on malicious traffic samples is a crucial step for someone attempting to defend a network against unknown threats. Captures such as the one described here are a great way to develop skills in writing those signatures. To learn more about intrusion detection and attack signatures, visit the Sax2 project at https://www.ids-sax2.com/sax2-intrusion-prevention-system/.
ARP Cache Poisoning
In Chapter 2, we discussed ARP cache poisoning as a way to tap into the wire and intercept traffic from hosts whose packets you need to analyze. ARP cache poisoning can be an effective and useful tool for a network engineer. However,
when used with malicious intent, it’s also a very lethal form of man-inthe- middle (MITM) attack.
In an MITM attack, an attacker redirects traffic between two hosts in order to intercept or modify it in transit. There are many forms of MITM attacks, including session hijacking, DNS spoofing, and SSL hijacking.
ARP cache poisoning works because specially crafted ARP packets trick two hosts into thinking they are communicating with each other, when, in fact, they are communicating with a third party who is relaying packets as an intermediary.
The file arppoison.pcap contains an example of ARP cache poisoning. When you open it, you’ll see at first glance that this traffic appears normal. However, if you follow the packets, you will see our victim, 172.16.0.107, browsing to Google and performing a search. As a result of this search, there is quite a bit of HTTP traffic with some DNS queries mixed in.
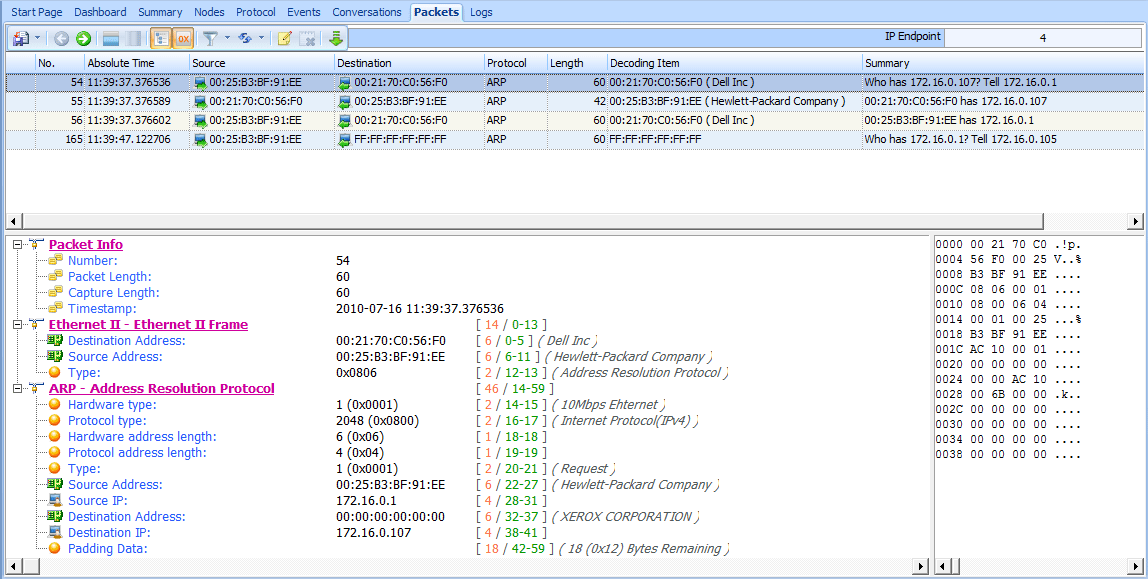
this changes at packet 54, when we see some peculiar ARP traffic occurring between the Dell host (our victim) and a newly introduced HP host (the attacker), as shown in Figure 10-16.
Figure 10-16: Strange ARP traffic between the Dell device and an HP device
Before proceeding further, note the endpoints involved in this communication, which are listed in Table 10-3.
Table 10-3: Endpoints Being Monitored
But what makes this traffic strange? Recall from our discussion of ARP in Chapter 6 that there are two primary types of ARP packets: a request and a response. The request packet is sent as a broadcast to all hosts on the network in order to find the machine that has the MAC address associated with a particular IP address. The response is then sent as a unicast packet from the machine that replies to the device that transmitted the request. Given this background, we can identify a few peculiar things in this communication sequence, referring to Figure 10-16.
First, packet 54 is an ARP request sent from the attacker, with MAC address 00:25:b3:bf:91:ee, as a unicast packet directly to the victim with MAC 00:21:70:c0:56:f0 . This type of request should be broadcast to all hosts on the network, but it targets the victim directly. Also, notice that although this packet is sent from the attacker and includes the attacker’s MAC address in the ARP header, it lists the router’s IP address rather than its own.
This packet is followed by a response from the victim to the attacker containing its MAC address information . The real voodoo here occurs in packet 56, when the attacker sends a packet to the victim with an unsolicited ARP reply telling it that 172.16.0.1 is located at its MAC address, 00:25:b3:bf:91:ee . The problem is that the MAC address 172.16.0.1 isn’t 00:25:b3:bf:91:ee but 00:26:0b:31:07:33. We know this because we saw the router at 172.16.0.1 communicating with the victim earlier in the packet capture. Since the ARP protocol is inherently insecure (it accepts unsolicited updates to its ARP table), the victim will now be sending traffic that should be going to the router to the attacker instead.
TIPS Because this packet capture was taken from the victim’s machine, you don’t actually see the entire picture. For this attack to work, the attacker must send the same sequence of packets to the router in order to trick it into thinking the attacker is actually the victim, but we would need to take another packet capture from the router (or the attacker) in
order to see those packets.
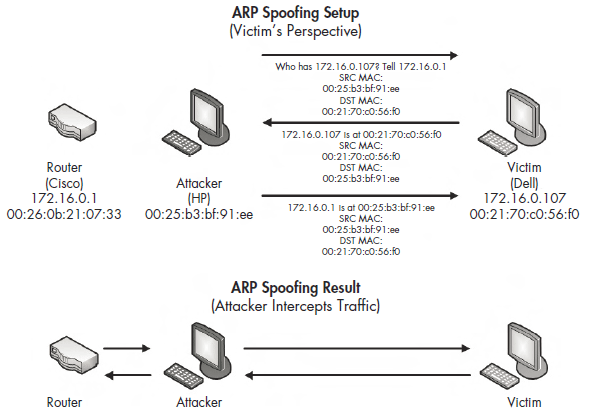
Once both parties have been duped, the communication between the victim and the router flows through the attacker, as illustrated in Figure 10-17.
Figure 10-17: ARP cache poisoning as an MITM attack
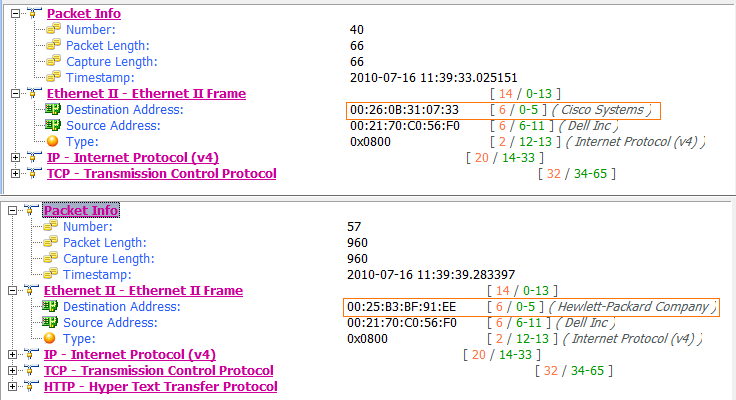
Packet 57 confirms the success of this attack. When you compare this packet with one sent before the mysterious ARP traffic, such as packet 40 (see Figure 10-18), you will see that the IP address of the remote server (Google) remains the same , but the target MAC address has changed . This change in MAC address tells us that the traffic is now being routed through the attacker before it gets to the router.
Because this attack is so subtle, it’s very difficult to detect. To find it, you typically need the aid of an IDS configured specifically to address it or software running on devices designed to detect sudden changes in ARP table entries. Since you will most likely use ARP cache poisoning to capture packets on networks you are analyzing, it’s important to know how this technique can be used against you as well.
Figure 10-18: The change in target MAC address shows this attack was a success.


